The best mic stand for podcasting is the one that keeps your microphone stable, correctly positioned, and out of the way of your camera, keyboard, and hands. A heavy broadcast microphone may need a reinforced boom arm or floor stand, while a lightweight USB microphone can work well on a small desktop base. Your recording position matters just as much: a fixed solo host, a standing presenter, and a two-person video podcast all need different stand designs.
This guide compares desk stands, boom arms, and floor stands by the factors that affect real recording sessions. It also explains how to check weight limits, measure desk-clamp clearance, avoid camera obstruction, route cables, and install a stand safely.
1. Desk stand versus boom arm versus floor stand
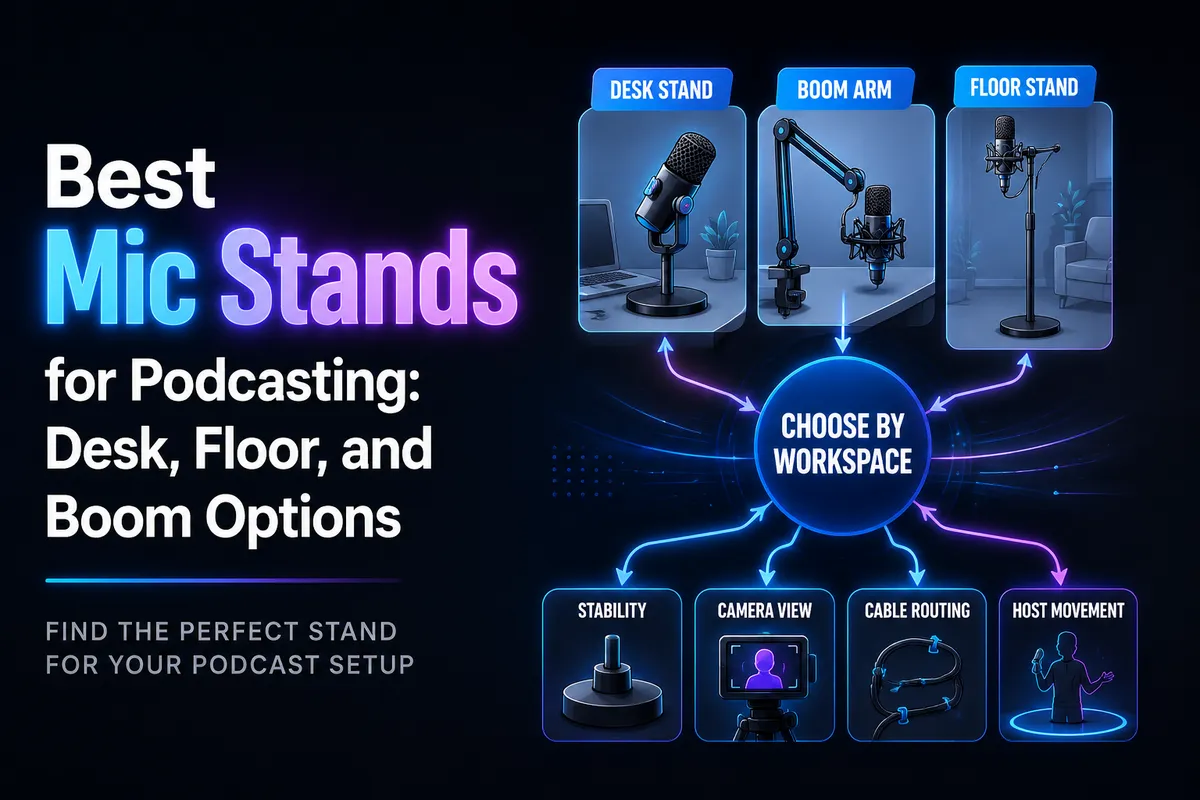
Microphone stands generally fall into three useful podcasting categories. Each solves a different workspace problem.
Desktop mic stands: compact and predictable
A desktop stand places the microphone on a weighted base, tripod, or short pedestal directly on your desk. It is usually the simplest option to install: set it down, attach the microphone, aim it toward your mouth, and connect the cable.
This design works well when you sit in one position and do not need the microphone to move out of the way. It is also useful for small desks, temporary recording spaces, and hosts who want a clean setup with no clamp attached to the furniture.
- Best for: fixed seated recording, compact desks, video calls, and simple USB microphones.
- Main advantage: no clamp installation and little mechanical adjustment.
- Main limitation: the base occupies desk space and can transmit keyboard or hand vibrations.
Look for a broad, heavy base or a tripod with rubber feet. A very light base may allow the microphone to tip when the microphone is extended forward or fitted with a shock mount.
Desk-mounted boom arms: flexible positioning
A desk-mounted boom arm clamps to the edge of a desk or installs through a drilled mounting hole. Its joints let you bring the microphone close to your mouth, swing it aside between takes, and adjust its height without lifting a heavy base.
For many seated podcasters, this is the most practical mic stand category. A well-designed arm can preserve desk space, keep the microphone closer to the correct speaking position, and make it easier to maintain the same distance throughout an episode.
For example, RØDE describes its PSA1+ as supporting microphones and shock mounts from 94 grams to 1.2 kilograms, with integrated cable management and substantial horizontal and vertical reach. Those specifications show why the complete microphone setup—not only the microphone body—must be included when checking compatibility. See the manufacturer’s PSA1+ specifications for an example of the information to compare.
- Best for: seated hosts, video podcasts, streamers, and anyone who needs the microphone to move.
- Main advantage: strong reach and easy repositioning without consuming much desk surface.
- Main limitation: it requires suitable desk thickness, clamp clearance, and enough space for the arm’s movement.
Floor stands: independent and spacious
A floor stand uses a weighted base or tripod on the floor. Some models include a boom section so the microphone can extend over a desk, chair, or instrument. Because the stand does not rely on the desk, it can be a better solution for glass desks, thin shelves, rounded edges, or workstations with no usable clamp area.
Floor stands are also useful when you record standing, move around during a presentation, or need a microphone positioned beside rather than directly in front of a monitor. Their tradeoff is a larger footprint and more visible hardware in the camera frame.
- Best for: standing hosts, flexible studio layouts, unsuitable desks, and microphones that need a broad support base.
- Main advantage: it transfers the load to the floor instead of the desk.
- Main limitation: the base can become a trip hazard and may take more time to position correctly.
2. Stability starts with microphone weight
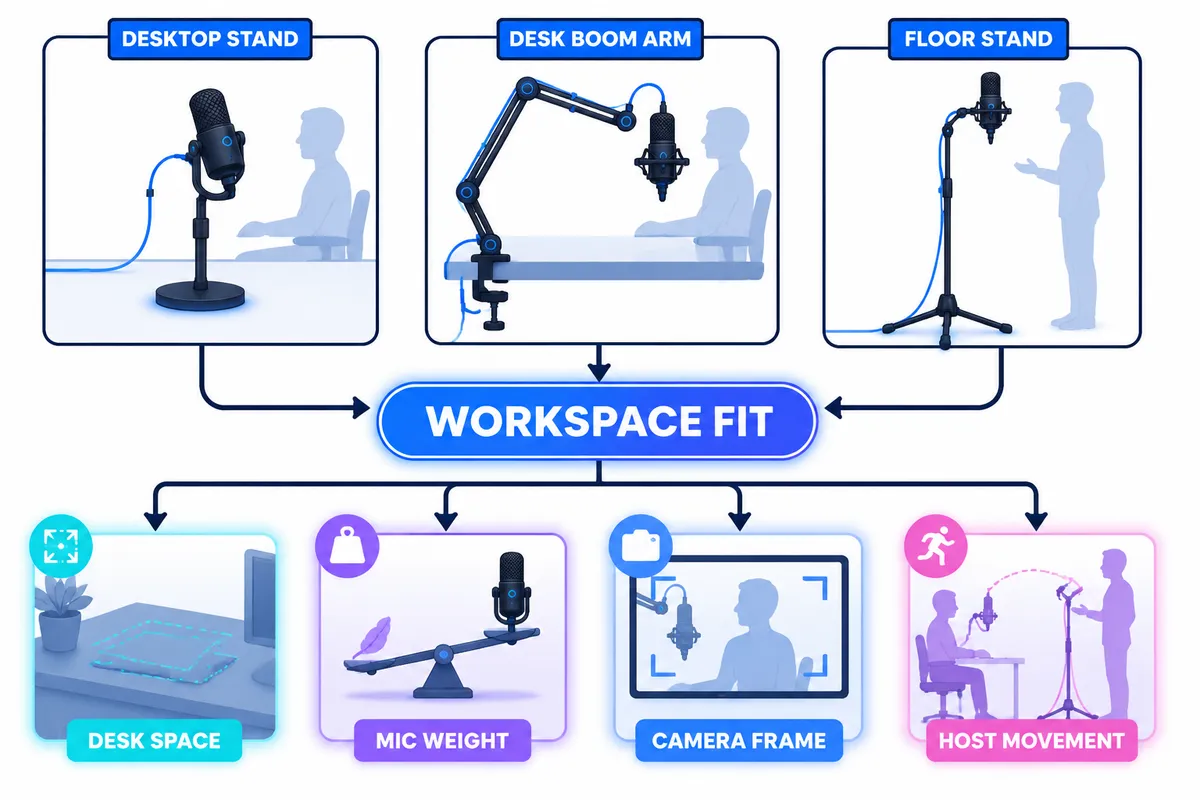
A mic stand’s stated capacity is only useful when you calculate the weight of the entire mounted setup. Add the microphone, shock mount or clip, cable strain, and any adapter. A microphone that appears compatible by itself may be too demanding once accessories are attached at the end of a long arm.
Pay particular attention to the arm’s maximum supported weight at the position you intend to use. A microphone placed near the arm’s outer reach creates more leverage than one mounted close to the joints. If the arm slowly rises, droops, or rotates after tightening, the setup is not balanced for that position.
How much capacity should you leave?
Do not select a stand that is barely rated for your setup. Leave practical headroom for the microphone, shock mount, cable, and movement. The exact margin depends on the manufacturer’s design, but a stand that operates near its limit will generally offer less adjustment range and may need frequent tightening.
RØDE’s support documentation illustrates why this check matters: its guidance for the PSA1 discusses the supported weight of the microphone together with the shock mount or clip, rather than treating the microphone alone as the deciding number. Review the manufacturer’s stability guidance before pairing a heavier microphone with an arm.
What makes a desktop stand stable?
- A heavy base with a low center of gravity.
- Rubber or foam feet that resist sliding.
- A short, rigid stem when the microphone does not need extended reach.
- A boom joint that locks firmly instead of relying on friction alone.
- A base wide enough to resist tipping when the microphone points forward.
Soft padding under a desktop base can reduce desk noise, but padding should not make the stand unstable. If the base rocks, slides, or compresses unevenly, it can create more problems than it solves.
3. Desk-clamp clearance and mounting
A desk-mounted mic stand can be excellent in a small studio, but only if the clamp can grip a structurally sound section of the desk. Measure the desk thickness at the exact mounting point. Then check whether the underside is blocked by a drawer, support rail, cable tray, modesty panel, or desk frame.
Measure these four areas before buying
- Top thickness: confirm that the desk fits within the clamp’s supported range.
- Underside clearance: make sure the lower clamp pad can sit flat.
- Edge shape: rounded or beveled edges may reduce the clamp’s grip.
- Structural support: avoid attaching to a thin decorative panel or unsupported shelf.
Some stands offer both a clamp and a threaded desk insert. The insert requires drilling, but it can produce a more permanent and less visually bulky installation. A clamp is better when you rent, rearrange your workspace, or want to remove the stand later.
Shure’s Gator boom arm documentation provides a useful example of the details to look for: the product specifies desk thickness, extension range, rotation, and cable organization rather than describing the stand only as “adjustable.” Compare those mounting and reach specifications with your desk before ordering.
4. Reach, height, and camera visibility
The correct mic stand should place the microphone close enough for consistent vocal level without blocking your face, camera lens, notes, or guests. Before choosing a stand, sketch your recording position from the camera’s viewpoint.
For a seated host, the microphone may approach from below, above, or from the side. A low-profile arm can keep the hardware below the camera frame, while a longer arm may be better when the desk is deep or the microphone must come from behind a monitor.
Ask these positioning questions
- Will the microphone enter the frame from the left, right, top, or bottom?
- Does your camera use a wide shot that shows the entire desk?
- Do you need to move the microphone away when introducing a guest or showing a product?
- Will you record sitting, standing, or switching between both?
- Can the stand reach your mouth without crossing directly in front of your face?
More reach is not automatically better. A long arm can create extra leverage, occupy more visual space, and make the microphone harder to keep still. Choose enough reach to clear your monitor and keyboard, then prioritize rigidity and smooth adjustment.
5. Cable routing and vibration control
A stand should support the microphone without adding avoidable noise. Cable routing is part of that job. A loose cable hanging from the microphone can pull on the arm, brush against the desk, or transmit movement into the microphone mount.
Integrated channels, clips, or sleeves help keep the cable close to the stand. RØDE lists cable management as a feature of the PSA1+, while Shure’s Gator arm documentation also highlights cable organization. These features are especially valuable when the microphone moves frequently during recording.
Reduce vibration at the source
- Use a shock mount when your microphone and stand support one.
- Keep the clamp away from the section of desk where you type or tap.
- Route the cable with a small amount of slack near the microphone joint.
- Do not let the cable pull sideways on the microphone capsule or connector.
- Use a stable base rather than relying on a loose stack of books or improvised padding.
A shock mount can reduce handling and structure-borne vibration, but it cannot compensate for a stand that is tipping, sliding, or overloaded. Audix describes its shock-mount accessories as tools for reducing vibration, handling noise, and plosives; that is a useful distinction because a shock mount complements a stable stand rather than replacing one. See microphone shock-mount options and compatibility details.
6. Best mic stand use cases by workspace
| Workspace or recording style | Most suitable stand category | Why it fits | Watch for |
|---|---|---|---|
| Small desk with limited surface | Clamp-mounted boom arm | Preserves usable desk space | Clamp clearance and arm reach |
| Fixed solo recording position | Desktop stand | Simple, quick, and predictable | Base size and vibration |
| Standing podcast or presentation | Floor stand | Independent height and placement | Trip hazards and camera visibility |
| Wide video-podcast framing | Low-profile boom arm or floor stand | Can keep hardware outside the face area | Clearance behind monitors and chairs |
| Heavy broadcast microphone | High-capacity boom arm or floor stand | Better leverage and load support | Total mounted weight |
| Shared desk or temporary setup | Clamp-mounted arm | Easy to reposition or remove | Repeated tightening and desk finish |
7. Installation and safety checks
Most mic stand problems begin during installation. A stand that feels stable before the microphone is attached may shift once the arm is extended and the cable is connected.
Desk-mounted stand checklist
- Place the clamp on a solid, supported part of the desk.
- Use any supplied protective pad between the clamp and the desk surface.
- Tighten the clamp firmly by hand, without forcing the mechanism.
- Attach the arm and confirm that every joint is fully seated.
- Set the microphone near the intended recording position before tightening adjustment knobs.
- Move the arm slowly through its range to check for desk flex or clamp movement.
- Route the cable with slack and repeat the movement test.
Floor-stand checklist
- Spread tripod legs fully or place the weighted base on a level surface.
- Keep the base outside the main walking path.
- Position the boom so the microphone does not make the stand top-heavy.
- Secure excess cable along the stand or away from feet.
- Check that the stand remains stable when the microphone is gently nudged.
Never use a stand with stripped threads, cracked plastic, bent joints, or a clamp that no longer holds pressure. A falling microphone can damage the microphone, interface, desk, and nearby equipment.
8. Buying checklist
Use this checklist before comparing individual models or prices:
- Microphone weight: include the shock mount, clip, adapter, and cable.
- Mounting thread: verify the microphone clip or shock mount uses a compatible thread or includes an adapter.
- Desk measurements: measure thickness, edge shape, and underside clearance.
- Reach: confirm the arm can reach your mouth without crossing your camera’s most important framing area.
- Height: check whether it supports your seated or standing position.
- Base footprint: make sure a desktop or floor stand will not interfere with typing, pedals, or walking.
- Cable routing: look for clips, channels, or enough room to secure the cable independently.
- Vibration control: consider rubber feet, a padded base, a shock mount, or a reinforced clamp.
- Adjustment method: decide whether you prefer knobs, friction joints, springs, or a fixed position.
- Camera appearance: choose a profile and mounting direction that support your shot.
Not every microphone fits every stand directly. Compatibility can depend on the microphone clip, shock mount, thread size, and adapter. Some accessories use standard 5/8-inch microphone-stand threading, while other microphones require a dedicated mount. Audix, for example, specifies standard 5/8-inch attachment for one of its microphone stand adapters. Check the mount’s thread requirements instead of assuming that a universal label guarantees a direct fit.
9. Mic stand recommendations by recording style
Choose a desktop stand for a fixed seated host
Pick a desktop stand if your microphone stays in one position, your desk has limited clamp access, and you prefer a fast setup. Prioritize a wide weighted base, non-slip feet, and a height that places the microphone near mouth level without forcing you to lean forward.
Choose a desk-mounted boom arm for a flexible video setup
Choose a boom arm when you need to swing the microphone aside, keep the desk surface clear, or change between a close podcast shot and a wider camera frame. Confirm total weight support and clamp dimensions before focusing on appearance or price.
Choose a floor stand for standing hosts or difficult desks
A floor stand is the safer starting point when your desk is too thin, too fragile, glass-topped, or crowded with equipment. It is also a strong fit for standing recordings and hosts who move more than a seated presenter. Plan the floor footprint and cable path before setting up the camera.
Choose a reinforced option for a heavy broadcast microphone
For a large microphone with a substantial shock mount, select a stand with clearly published capacity and sturdy joints. Keep the microphone closer to the arm’s support point when possible, and avoid extending a heavy setup farther than necessary.
What is a mic stand called?
“Mic stand” is the common general term. You may also see desktop microphone stand, boom arm, boom stand, tripod stand, floor stand, or pedestal stand. These names describe the stand’s shape and mounting method, not necessarily its quality or compatibility.
What can I use instead of a mic stand?
For a short-term recording, you can use a stable, padded surface or a purpose-built microphone mount attached to compatible hardware. Avoid balancing a microphone on books, loose boxes, or furniture edges. Improvised supports can slide, transmit desk noise, block ventilation, or allow the microphone to fall.
What’s the best mic stand?
The best mic stand is the one that matches your complete setup. A clamp-mounted boom arm is often the most versatile choice for a seated podcaster, but a desktop stand can be better for a fixed position, and a floor stand can be better for standing hosts or unsuitable desks. Stability and correct reach matter more than choosing the most elaborate design.
Do all mic stands fit all microphones?
No. Check the microphone’s clip, shock mount, thread, adapter, and weight. A stand may physically attach to a microphone but still be unsuitable if the mount is loose, the thread is incompatible, or the total load exceeds the stand’s supported range.
How the right stand improves the rest of your workflow
A stable microphone position makes editing easier because your distance and tone are more consistent from one take to the next. After you solve the physical setup, you can improve the rest of production with a podcast script and pre-production workflow, then use AI transcription tools for podcast episodes or learn how to turn episodes into blog posts.
Start by measuring the desk, weighing the complete microphone assembly, and mapping the camera frame. Those three checks will usually narrow the choice faster than browsing a long list of stands. Choose the simplest design that gives you stable support, comfortable reach, clean cable routing, and enough room to record naturally.