Phase 1: Understanding the Physics of Sound
Before you can effectively remove echo from audio, you must understand why it happens in the first place. In audio engineering, what most podcasters call an “echo” is actually Reverberation (Reverb) or “Flutter Echo”.
When you speak into a microphone, your vocal cords project sound waves in all directions. The “direct sound” hits the microphone capsule immediately. However, the other sound waves travel past the microphone, bounce off your computer monitor, hit the bare walls, bounce off the hardwood floor, and finally return to the microphone milliseconds later. This delayed reflection is what causes that hollow, distant, “bathroom” sound. To successfully remove echo from audio, we must stop these reflections from re-entering the microphone capsule.
Hard, flat surfaces (like glass windows, concrete walls, and wooden desks) reflect sound perfectly. Soft, porous surfaces (like thick carpets, heavy curtains, and acoustic foam) absorb sound waves, converting their kinetic energy into microscopic amounts of heat. Therefore, the absolute best way to remove echo from audio is to prevent the sound from bouncing in the first place.
Phase 2: Hardware & Room Treatment (The Cure)
Audio engineers have a famous saying: “Fix it in the room, not in the mix.” While software can certainly help you remove echo from audio, relying solely on digital processing often degrades the quality of your natural voice. Treating your recording environment is always the primary, most vital step. If you want to learn how to fix echo audio professionally, start with your physical space.
1. The “Free” Furniture Method
You do not need to spend thousands of dollars on professional Acoustics. If you are recording in a bare room, simply bringing in soft furniture will drastically remove echo from audio. Place a thick rug under your desk to stop floor reflections. Close your heavy curtains. If you are on a tight budget, the classic “closet trick”—recording your podcast while surrounded by hanging winter coats—remains one of the most effective ways to capture studio-quality, dead-silent audio.
2. Acoustic Panels and Moving Blankets
If you have a dedicated studio space, hanging heavy-duty moving blankets on the walls behind your monitor is a cheap and incredibly effective method. For a more professional look, invest in high-density fiberglass acoustic panels.
- Common Acoustic Mistake: Do not buy cheap, thin egg-crate foam from Amazon, and definitely do not glue cardboard egg cartons to your wall. These materials are too thin to absorb the lower frequencies of the human voice. They only absorb high frequencies, which will leave your voice sounding muddy and muffled, and they will absolutely fail to remove echo from audio.
📊 Audit Your Room Acoustics
Before you start recording, you must verify your noise floor. Test if your acoustic treatment worked using our free background noise checker. It will instantly analyze your room’s ambient noise to ensure your microphone isn’t picking up hidden reflections, AC hums, or fan noise.
Phase 3: Microphone Placement & Technique
Sometimes the room isn’t the problem—the microphone is. Knowing how to fix echo audio often comes down to hardware selection and physical placement. If your microphone is too far away, you are recording the room, not your voice.
1. Choose a Dynamic Microphone
If you are desperately Googling how to remove echo from audio, there is a high probability you are using a Condenser microphone (like a Blue Yeti) placed on your desk. Condenser mics are incredibly sensitive; they will pick up a mouse squeaking three rooms away. To naturally remove echo from audio at the source, switch to a Dynamic microphone (like the Shure SM7B, Samson Q2U, or Audio-Technica ATR2100x). Dynamic microphones reject background noise and only pick up the sound immediately in front of the capsule.
2. The Proximity Effect & Gain Staging
You must speak close to the microphone—ideally 2 to 3 inches away. This triggers the “Proximity Effect,” giving your voice that deep, rich, radio-broadcaster bass. More importantly, getting closer to the microphone allows you to turn the microphone’s input “Gain” down on your audio interface. By turning the input volume down, the microphone becomes completely “deaf” to the echoes bouncing around the back of the room. This is the ultimate secret to remove echo from audio without using any software at all.
Phase 4: Traditional Software Engineering
What happens if the interview is already recorded? If you are stuck with a terrible, reverberant file from a remote guest and need to know how to fix echo audio in post-production, traditional Digital Audio Workstations (DAWs) like Audacity, Adobe Premiere, or Logic Pro offer several engineering techniques to manually remove echo from audio.
1. The Noise Gate Technique
A noise gate acts like an automated digital door. When you speak, the door opens, allowing your voice through. When you stop speaking, the door slams shut, cutting off the audio completely. Setting an aggressive noise gate will not remove echo from audio while you are actively speaking, but it will instantly silence the distracting reverb tails during your natural pauses, making the overall track sound significantly tighter and cleaner.
2. EQ (Equalization) Carving
Echoes often build up in specific frequency ranges, typically in the lower-mids (around 200Hz to 400Hz). By using a parametric EQ in your software, you can gently lower these specific frequencies. While this won’t perfectly remove echo from audio, it will remove the “muddy” buildup and make your syllables much more articulate and easier for listeners to understand.
3. Dedicated De-Reverb Plugins
Advanced audio restoration plugins, like the industry-standard iZotope RX series, feature dedicated “De-Reverb” modules. These algorithmic tools analyze the decay profile of your audio and attempt to strip the echo away mathematically. However, these tools are extremely expensive, highly complex to use, and if pushed too hard, they will leave your voice sounding underwater and heavily distorted.
Phase 5: The AI Revolution (One-Click Fixes)
If you don’t have an audio engineering degree, traditional EQ and gating will be frustrating and time-consuming. In 2026, artificial intelligence has completely revolutionized how we approach post-production. If you want to know how to fix echo audio with zero effort, AI neural networks are the definitive answer.
Unlike traditional plugins that try to “subtract” the echo from the waveform, modern AI tools don’t actually remove echo from audio in the traditional sense. Instead, they completely re-synthesize your voice from scratch. They listen to the recording, understand the words you are saying, and generate a brand-new, studio-quality vocal track, leaving the original echoey recording behind entirely.
⚡ Which AI Tool Should You Use?
If hardware fixes fail, AI tools can eliminate reverb instantly. Read our comparison of Adobe Podcast Enhance and Cleanvoice to see which sounds more natural, and learn how to implement them into your editing pipeline.
The Professional AI Mixing Trick: When you use AI to remove echo from audio, there is one crucial rule: Do not push the AI to 100%. If you set an AI enhancement slider to maximum, it will aggressively destroy all background noise and perfectly remove echo from audio, but it will also strip away the high-frequency “breath” of your voice, making you sound like a robotic customer service prompt.
The secret to professional editing is “Parallel Processing.” You must blend the AI-repaired track with your original raw audio at an 80/20 ratio. This allows you to efficiently remove echo from audio while retaining the organic, human texture of the original performance.
Phase 6: The Final Polish (Don’t Skip This!)
Once you successfully remove echo from audio using acoustic treatment or AI software, your job is not finished. Audio manipulation (especially AI voice synthesis and noise gating) drastically changes the volume levels of your track. If you upload the file directly to Spotify or Apple Podcasts right now, it will likely be far too quiet or heavily distorted.
Mastering for Streaming Platforms
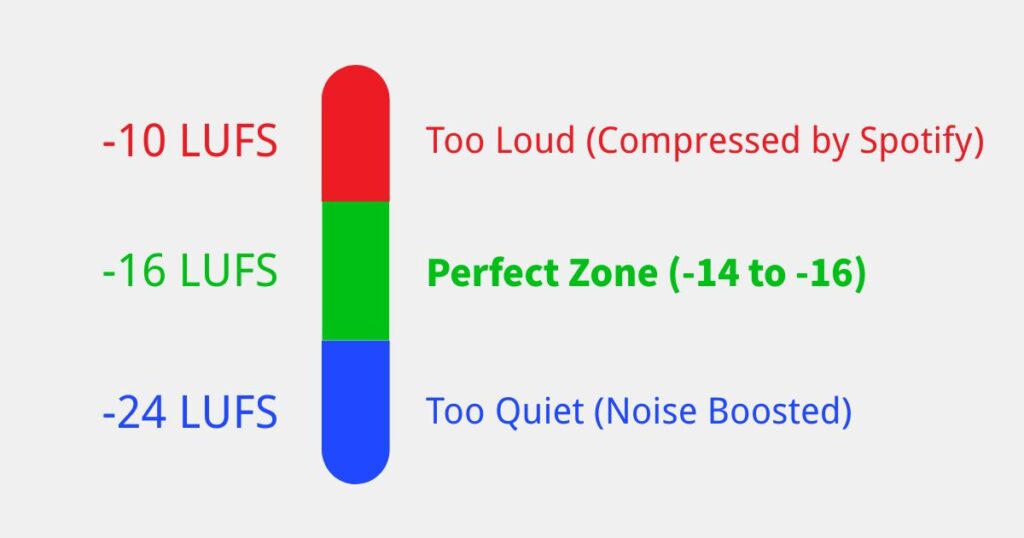
Streaming platforms have strict Loudness Units relative to Full Scale (LUFS) requirements. Spotify and Apple Podcasts demand a broadcast standard of -14 LUFS to -16 LUFS. When you remove echo from audio, you usually lower the overall energy (RMS) and density of the file. You must re-amplify and normalize your newly cleaned track to meet these strict industry standards.
Once your audio is clean and echo-free, make sure it hits Spotify’s standards using our free LUFS analyzer. This ensures your listeners never have to constantly adjust their volume dials.
Frequently Asked Questions (FAQ)
What is the best way to remove echo from audio?
The absolute best way to remove echo from audio is preventative physical treatment. Recording in a closet filled with clothes or hanging moving blankets around your dynamic microphone will always yield a higher-quality, more natural result than trying to fix a ruined file with AI software later.
How to fix echo audio for free?
If you are looking for how to fix echo audio without spending money on premium software, Adobe Podcast Enhance is a free, browser-based AI tool. You simply upload your MP3 or WAV file, and its neural network will automatically synthesize a clean voice track and remove echo from audio within seconds.
Why does my podcast microphone echo so much?
If you are experiencing severe room reverb, you are likely using a condenser microphone (like a Blue Yeti) placed too far away from your mouth. To instantly remove echo from audio at the source, switch to a dynamic microphone, turn down the input gain, and speak within 2 to 3 inches of the capsule. This increases the direct signal and naturally lowers the background reflections.