A mic quality test helps you answer a practical question: can this microphone produce a voice recording that listeners can understand comfortably and that you can edit without fighting obvious problems? The answer depends on more than the microphone itself. Distance, angle, input gain, room reflections, background noise, and your speaking style all affect the result.
That is why a quick browser check is useful for confirming that an input is detected, but it is not a complete publishing evaluation. Tools such as MicTests can help verify that a microphone is working, while a proper recording test shows whether the result is suitable for a podcast, interview, voice-over, or other spoken-word project.
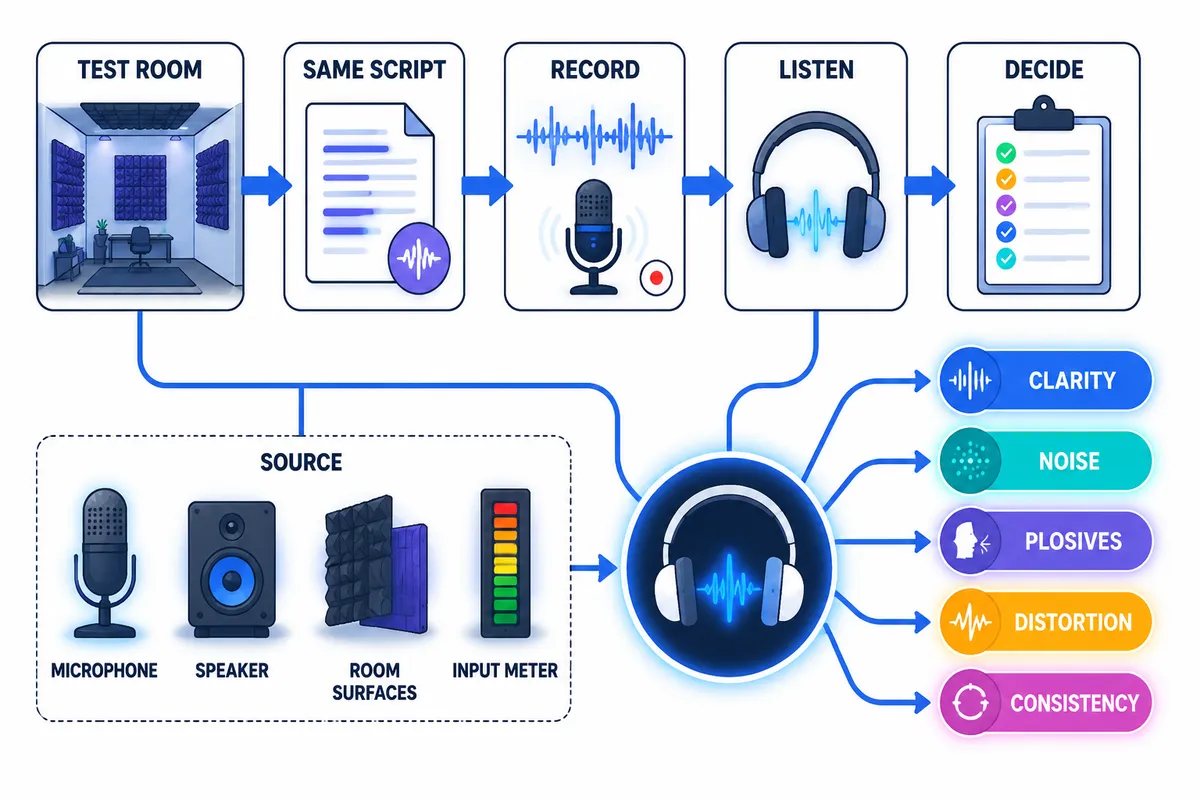
This guide gives you a repeatable process. It is designed for pre-purchase comparisons, a new recording setup, or troubleshooting—not for chasing a single loudness number. The goal is to identify what listeners will actually notice.
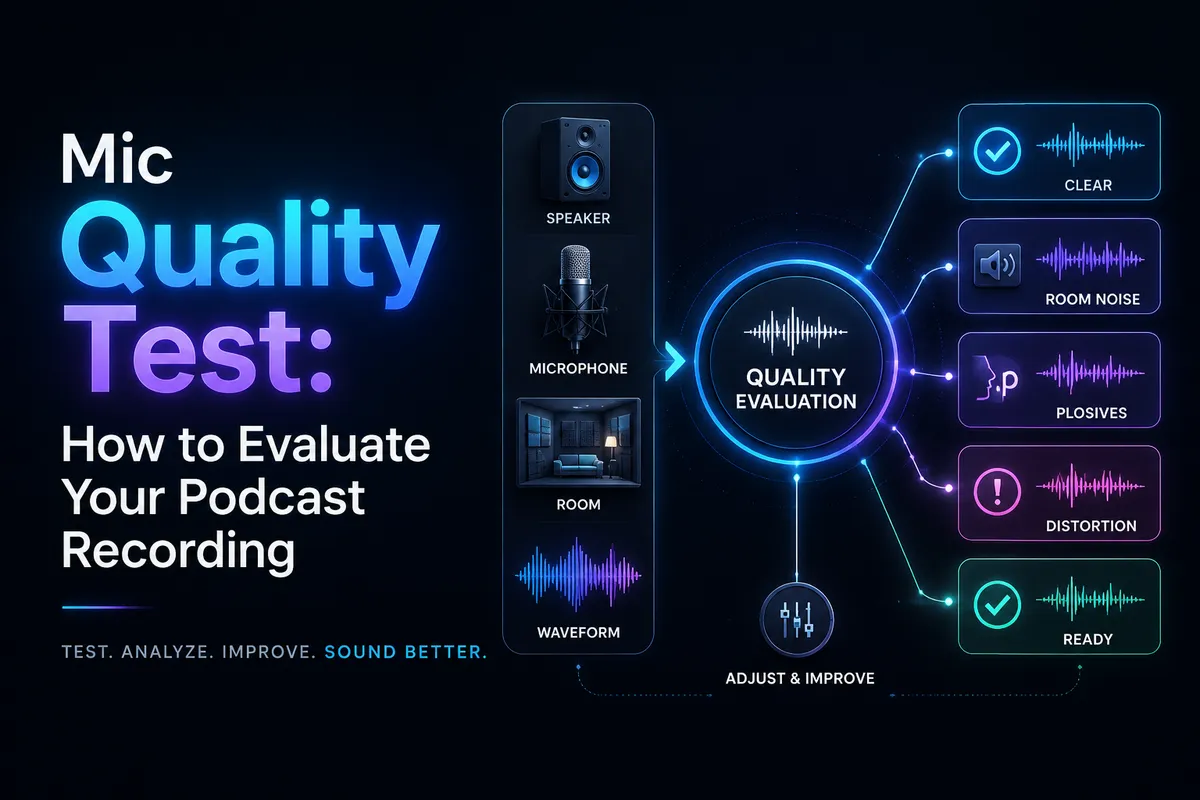
What makes a microphone recording usable?
A usable recording does not need to sound expensive or studio-perfect. It needs to preserve the speaker’s words, avoid distracting technical defects, and remain consistent enough that editing does not become exhausting.
Judge the recording against these six standards:
- Speech intelligibility: You can understand every sentence without repeatedly concentrating or replaying it.
- Clarity: Consonants such as “t,” “k,” “f,” “s,” and “sh” remain distinct without sounding painfully sharp.
- Controlled room sound: The voice does not sound like it is bouncing around a bare room or sitting far away from the listener.
- Low distraction: Computer fans, traffic, HVAC noise, chair movement, and handling sounds do not compete with the voice.
- Clean peaks: Loud words do not crackle, crunch, or sound flattened by overload.
- Consistency: Small changes in head position or speaking energy do not cause dramatic shifts in tone or volume.
A microphone can pass some of these checks and fail others. For example, a sensitive condenser microphone may capture plenty of detail but also reveal room reflections and computer noise. RØDE notes that more sensitive condenser microphones are generally better suited to rooms with stronger acoustic control, while microphone technique and placement have a major effect on professional results. RØDE’s podcast recording guidance provides useful context for this relationship.
How do you prepare a fair mic quality test?
The biggest mistake is changing several variables at once. If you move the microphone, change the room, apply processing, and read a different script, you will not know what caused the improvement.
Keep the test environment stable
Choose one quiet location and use it for every take. Close windows, pause noisy appliances, silence phone notifications, and avoid testing beside a reflective kitchen, empty office, or hard-walled hallway if that is not where you normally record.
You do not need a professional booth. A room with curtains, rugs, books, furniture, or other soft and irregular surfaces will usually produce a more useful spoken-word test than a nearly empty room. RØDE recommends choosing a quiet space with minimal reflective surfaces when reducing unwanted spill and room sound. Its room and microphone placement guidance explains why the recording space matters.
Use the same recording chain
For a fair comparison, keep the following unchanged:
- Recording application
- Interface or USB connection
- Sample rate and file format
- Input channel
- Mic stand or mounting position
- Headphones used for monitoring
- Any software processing, such as EQ, compression, noise reduction, or automatic enhancement
For the first pass, record without processing. You can later test your normal editing chain, but raw audio makes it easier to separate microphone and room behavior from software effects.
Set a safe input level
Set the input so ordinary speech is comfortably below the top of the meter, with louder words leaving visible headroom. Do not raise the gain simply because the waveform looks small. A recording that is too hot can clip before you have a chance to repair it.
Audacity’s recording guidance recommends monitoring the input meter and lowering the recording level if normal speech reaches the yellow or red area near the top of the scale. Its troubleshooting documentation also explains that crackles and distortion during loud passages can indicate clipping. See Audacity’s level-setting guide for the meter-based workflow.
What should you record during the test?
Use the same spoken script for every microphone or setup. A script of about 30 to 60 seconds is long enough to include normal speech, louder emphasis, pauses, plosive-heavy words, and a few challenging consonants.
Read naturally rather than performing an exaggerated announcer voice. The test should resemble the way you will actually host your show.
Your script can include lines such as:
“Today we are comparing clear podcast audio in a quiet room. Please check the texture of the voice, the detail in every sentence, and the space around the recording. Peter packed a paper parcel beside the portable printer. Six thoughtful guests shared useful suggestions. I will move slightly closer, then farther away, while continuing to speak at a comfortable level.”
Before recording, mark three moments in your notes:
- Normal speech: Your everyday speaking pace and volume.
- Emphasis: A slightly louder sentence, similar to making an important point on a podcast.
- Movement: A controlled change in distance or head angle to test consistency.
Record at least two takes. The first take helps you settle into the script; the second is more useful for comparison. If a take includes an accidental cough, chair bump, or missed line, repeat it rather than judging the microphone on that mistake.
How do you check clarity and speech detail?
Start with the most important test: can another person understand the recording without seeing the script?
Use a blind intelligibility check
Send the recording to a listener who has not read the script. Ask them to write down what they heard. Do not explain which microphone you are evaluating. Compare their transcription with the original.
This simple check is more meaningful than deciding whether the recording sounds “warm” or “professional.” A voice can have an attractive tone but still lose consonants, blur word endings, or become tiring to follow.
Listen especially for:
- Words that become unclear when the speaker gets quieter
- Consonants that disappear at the ends of sentences
- Sibilance that makes “s” and “sh” distracting
- A hollow or nasal character that changes familiar words
- A bass-heavy sound that makes the voice feel thick or muddy
- A thin sound that removes body and makes the speaker seem distant
Check the beginning, middle, and end of sentences
Many recordings sound acceptable during sustained vowels but become less intelligible during fast phrases. Replay sentence transitions and words with several consonants. If you have to turn up the volume or lean toward the speaker to understand ordinary speech, mark that as a problem.
Also compare the raw recording with a lightly edited version. If modest EQ or compression improves the voice, that is normal. If you need aggressive processing just to make basic words understandable, investigate placement, gain, room sound, or the microphone itself before committing to the setup.
How do you check noise, reflections, plosives, and distortion?
Background noise
Listen during pauses, not only while the speaker is talking. A fan, refrigerator, street, or computer may be masked by speech but become obvious between phrases. Check whether the noise is steady or intermittent.
Steady noise may be manageable in editing, but it still reduces separation between the voice and the background. Intermittent sounds—such as clicks, bumps, alerts, or passing vehicles—are often more disruptive because they attract attention.
Do not assume noise reduction makes a poor recording equivalent to a quiet one. Audacity warns that heavy noise reduction can introduce a watery or unnatural quality and recommends recording in the quietest environment possible in the first place. Its noise-reduction guidance is a useful reminder to treat cleanup as a limited aid, not a substitute for recording conditions.
Room reflections and echo
Room sound often appears as a short tail after words, a hollow quality, or a sense that the speaker is farther away than expected. Clap-free speech is a better test than a hand clap: read a sentence with several pauses and listen to what remains after each phrase.
Move closer to the microphone by a small, repeatable amount and record the same line. If the voice becomes more focused while the room sound decreases, distance is part of the problem. If the sound remains strongly reflective even at a practical speaking distance, the room may need treatment or a different microphone strategy.
Plosives and breath blasts
Plosives are low-frequency bursts created by fast-moving air during sounds such as “p,” “b,” and sometimes “t.” Play the test script and listen for thumps, sudden bass surges, or a brief dip in the voice after a burst of air.
Use a pop filter or windscreen, keep the microphone slightly to the side rather than directly in the path of your breath, and avoid speaking extremely close unless the microphone and technique support it. RØDE’s placement guidance specifically emphasizes the importance of microphone position and a pop filter for controlling unwanted air movement. Review the microphone and pop-filter positioning steps before deciding that plosives are a microphone defect.
Distortion and clipping
Distortion sounds like crackling, crunching, harshness, or a flattened voice—especially on louder words. Inspect the waveform only as a supporting clue. If peaks visibly press against the top and bottom boundaries and the sound is harsh, the input was likely overloaded.
Adobe describes clipping as audio amplitude exceeding the maximum available level, often because recording levels are too high. Light repair may help in some cases, but a clipped recording has already lost information. If distortion appears only when you speak loudly, lower the input gain and repeat the test before replacing the mic.
Why should you compare near and far microphone positions?
Distance is one of the fastest ways to discover whether a problem belongs to the microphone, the room, or the setup. Record the same script at three practical positions:
| Position | What it reveals | What to listen for |
|---|---|---|
| Close | Detail, proximity effect, plosives | Fullness, bass buildup, breath noise, thumps |
| Moderate | Likely everyday position | Balance between direct voice and room |
| Farther away | Room sensitivity and consistency | Echo, noise, loss of consonants, thinness |
Directional microphones generally reject more sound arriving from off-axis than omnidirectional microphones, and their frequency response can change as the sound source moves off-axis. Shure’s microphone guidance explains that distance and directionality affect the balance between direct voice, ambient sound, and tonal response. Shure’s polar-pattern overview gives a useful technical explanation.
The best setup is not necessarily the one with the richest bass at the closest distance. Choose the position that gives you enough detail while allowing natural movement. A microphone that sounds excellent only when your mouth is fixed in one exact spot may be less practical for a real podcast session.
How should you test headphones and playback devices?
Use closed-back headphones first if you have them, because they make low-level noise, room tails, mouth sounds, and distortion easier to identify. Keep the playback volume comfortable and consistent between samples. Louder audio often sounds subjectively better, so avoid judging two takes at different levels.
Then check the recording on at least two additional systems:
- Regular earbuds or wireless earbuds
- A laptop or desktop speaker
- A phone speaker, if your audience commonly listens that way
- Your normal car or portable speaker, if available
You are not trying to make every playback system sound identical. Instead, check whether the voice remains understandable and whether any defect becomes unusually obvious. A bass-heavy recording may seem impressive in headphones but lose clarity on a small speaker. A very bright recording may become tiring on earbuds.
Listen once without looking at the waveform. Then inspect the waveform or meters only to investigate something you heard. The listener’s experience comes first.
When should you keep the microphone, and when should you replace it?
Use a decision rubric instead of making a purchase decision from one attractive sample. Score each area from 0 to 2:
| Area | 0 points | 1 point | 2 points |
|---|---|---|---|
| Speech intelligibility | Frequently unclear | Mostly understandable | Easy to follow |
| Clarity and detail | Blurred or harsh | Acceptable with editing | Natural and articulate |
| Room sound | Distracting echo | Noticeable but manageable | Controlled |
| Noise | Competes with speech | Present in pauses | Low distraction |
| Plosives and handling | Frequent and severe | Occasional | Rare or easily prevented |
| Distortion | Audible overload | Only under unusual peaks | Clean at normal levels |
| Consistency | Very position-sensitive | Some variation | Stable in normal movement |
A high score suggests the microphone is usable in the tested environment. A middle score usually points to a setup or technique adjustment before replacement. A low score—especially for intelligibility or distortion—means you should identify the cause before publishing regularly.
Before replacing the microphone, repeat the test after changing only one factor:
- Lower the input gain.
- Move the microphone slightly closer or farther away.
- Rotate it a little off-axis.
- Add or reposition a pop filter.
- Reduce nearby noise.
- Change the room position or add soft furnishings.
- Check the cable, interface, input selection, and software track.
If the recording remains unclear or distorted after these controlled changes, the microphone, interface, or recording chain may be unsuitable for your use case. If only the room changes the result, buying a more expensive microphone may not solve the underlying problem.
Mic quality test worksheet
Copy this checklist into your production notes and use it whenever you compare microphones or change your recording space.
- Date and setup: ______________________________
- Microphone and input: ______________________________
- Room and position: ______________________________
- Script version: ______________________________
- Normal speech intelligibility: 0 / 1 / 2
- Consonant detail: 0 / 1 / 2
- Room reflections: 0 / 1 / 2
- Background noise: 0 / 1 / 2
- Plosives and breath blasts: 0 / 1 / 2
- Distortion or clipping: 0 / 1 / 2
- Consistency during movement: 0 / 1 / 2
- Best playback device: ______________________________
- Worst playback device: ______________________________
- One change to test next: ______________________________
What should you do after the mic quality test?
Once the recording passes your listening test, save the sample as a reference. Use it when changing rooms, interfaces, microphone positions, or editing presets. A reference recording can show whether a later problem is caused by the microphone or by the production workflow.
From there, improve the rest of the publishing process. If you plan to turn episodes into written content, see our guide to turning podcast episodes into blog posts. If you are building a repeatable production system, our podcast workflow with AI tools guide can help organize recording, editing, and repurposing. For the editing stage, compare the options in our guide to podcast editing software.
The most useful result of a mic quality test is not a perfect score. It is a clear diagnosis. You should know whether the recording is ready, whether one setup adjustment will fix it, or whether the microphone is genuinely holding back speech clarity. That distinction can save you from replacing good equipment—or publishing audio that listeners struggle to understand.