When comparing a condenser vs dynamic mic, the better choice is not automatically the microphone with the most detail or the highest price. For a small-business podcast, your room, speaking distance, guest setup, connection type, and total ownership cost matter just as much as the microphone’s sound.
A condenser can produce an open, detailed voice recording in a quiet space. A dynamic microphone can make a busy office, home workspace, or lightly treated room easier to manage. Neither type is universally better. The right decision is the one that gives you clean, repeatable speech without forcing you to redesign your entire recording workflow.
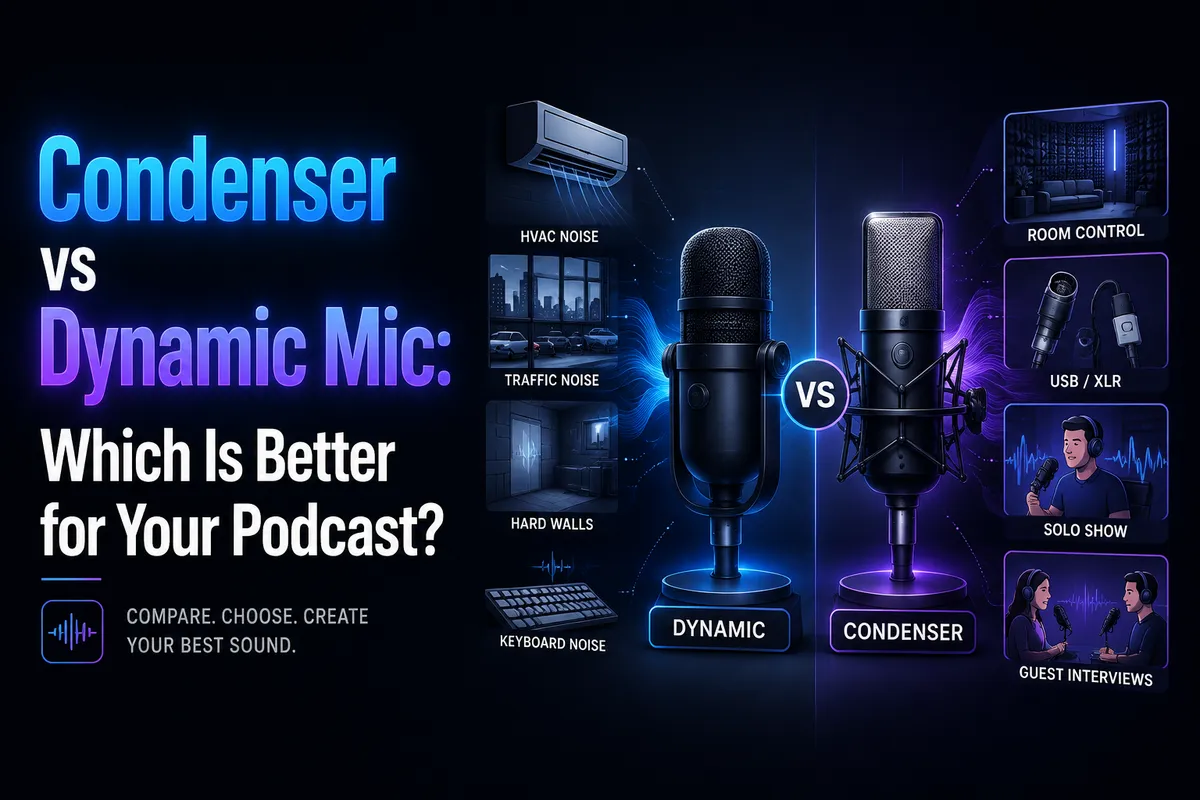
Condenser vs dynamic mic: when does each type win?
| Choose a dynamic mic when… | Choose a condenser mic when… |
|---|---|
| Your room has traffic, fans, HVAC, computer noise, or strong reflections. | Your recording room is quiet and acoustically controlled. |
| You can keep the microphone close to your mouth and want focused speech. | You want higher sensitivity and an open, detailed presentation. |
| You record guest interviews in changing locations. | You record mainly in one consistent studio-style space. |
| You want a rugged setup with fewer power requirements. | You have an interface or mixer that can provide phantom power. |
| You need a practical choice for video podcasts or livestreams. | You can manage room reflections, mouth noise, and background sound. |
This is a practical rule, not a guarantee. A dynamic microphone does not block every unwanted sound, and a condenser is not automatically unsuitable for a home office. The useful distinction is that condenser microphones generally have higher sensitivity, while close-positioned dynamic microphones can make it easier to prioritize the speaker over distant room sound. Shure’s microphone-technique guide explains the relationship between sensitivity, microphone distance, and sound sources.
How condenser and dynamic microphones capture sound
How a dynamic microphone works
A conventional dynamic microphone uses a diaphragm, voice coil, and magnet. Sound moves the diaphragm and attached coil inside a magnetic field, producing an electrical signal. Shure’s technical comparison describes this moving-coil design and contrasts it with the condenser operating principle.
Because a standard moving-coil dynamic microphone does not need active capsule electronics, it normally does not require phantom power. That does not mean every dynamic microphone has the same electrical requirements: USB dynamics include digital electronics, and unusual microphone designs should always be checked against the manufacturer’s documentation.
Dynamics are often useful for speech because they can be positioned close to the speaker. That close-working technique can improve the ratio of direct voice to distant room reflections. It can also make a podcast easier to record in a busy office, provided the host maintains a consistent distance.
A dynamic microphone is not automatically quiet. It can still capture a loud keyboard, chair movement, nearby air conditioner, or reflective wall. Its practical advantage comes from the combination of microphone design, directional pattern, close positioning, and sensible recording technique.
How a condenser microphone works
A condenser microphone uses a diaphragm and backplate to form a sound-sensitive capacitor. Changes in the distance between those surfaces create the electrical audio signal. Many condenser microphones also contain active electronics that require power. Shure explains that phantom power is typically supplied by a mixer or interface to power condenser microphone electronics.
Condenser microphones are often selected when the producer wants a sensitive, detailed capture. That can be valuable for a quiet solo podcast, a controlled voiceover space, or a video setup where the microphone must sit farther from the speaker than a typical broadcast dynamic.
The tradeoff is environmental detail. A sensitive condenser can make room reflections, HVAC noise, chair movement, keyboard clicks, breath sounds, and mouth sounds more noticeable. Those characteristics are not automatically flaws; they simply make the room and the speaker’s technique more important.
Room noise and acoustic treatment: the decision most buyers overlook
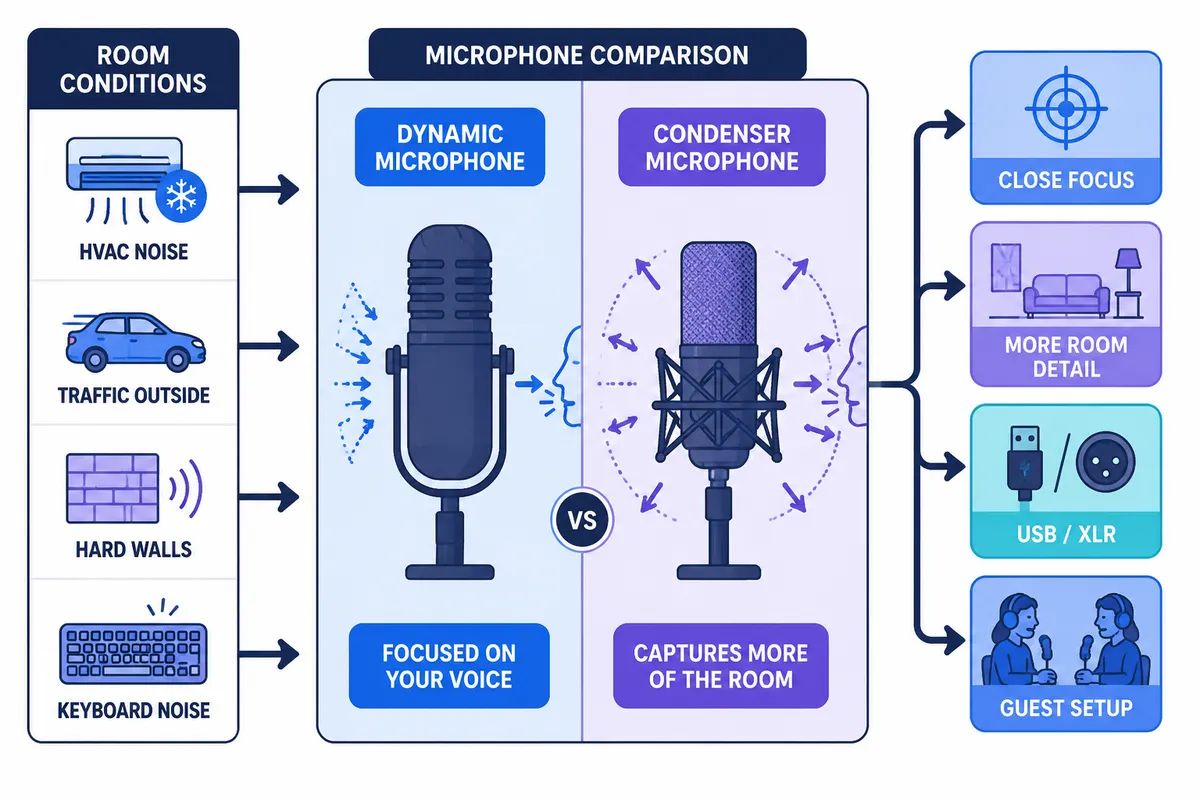
For small businesses, the room is often more important than the microphone’s category. You may be recording in a spare bedroom, office, conference room, storefront, or shared workspace rather than a dedicated studio.
When a dynamic mic is the practical choice
A dynamic microphone is usually the easier starting point when you hear:
- Air-conditioning or heating noise
- Computer fans
- Street traffic or nearby construction
- Room echo from bare walls and hard floors
- Keyboard, desk, or chair noise during interviews
- Other people working nearby
The reason is not that dynamics possess a magical noise-cancellation function. Rather, a close-positioned dynamic can help the direct voice dominate over distant sound. Audio-Technica’s podcasting guide similarly presents condenser microphones as highly sensitive and dynamics as useful for minimizing room noise in speech setups.
Placement still matters. If you speak from too far away, you will need more gain and the recording may contain more room sound. A dynamic microphone cannot replace a quiet recording time, a stable stand, or basic acoustic improvements.
When a condenser mic makes sense
A condenser can be a strong option when your recording space is quiet, soft-furnished, and consistent. Curtains, rugs, bookshelves, and upholstered furniture can help reduce strong reflections. You do not necessarily need expensive acoustic panels, but you should avoid placing the microphone in the middle of a reflective room with bare walls and glass surfaces surrounding the speaker.
Condensers are especially useful when the speaker stays in one position and you want detailed vocal capture. They can make a polished solo show sound present and intimate, but they also make inconsistent microphone technique more obvious.
Can acoustic treatment make a condenser the better choice?
Yes. Treatment can reduce reflections that otherwise make a condenser recording sound roomy or echoey. The important point is that treatment and microphone choice work together. If your room is already controlled, a condenser’s sensitivity can become an asset. If the room is noisy and reflective, the same sensitivity may create more editing work.
If you are hearing echo rather than simply choosing between microphone types, see Podtools’ guide on how to remove echo from audio. Software repair can help with some problems, but it cannot reliably recreate a clean direct recording after strong room reflections have been captured.
USB vs XLR: what changes for a small-business podcast?
USB and XLR describe connection methods, not microphone types. You can buy USB dynamics, XLR dynamics, USB condensers, and XLR condensers. The connection affects setup complexity, expansion options, monitoring, and total ownership cost.
USB microphones: easiest for solo recording
A USB microphone converts the microphone signal into digital audio inside the microphone and sends it directly to a computer or compatible device. For a solo host, this can reduce the number of separate components required. Many USB models also include a headphone output or direct-monitoring function, although the exact features vary by model.
USB is often the most convenient choice when:
- You record one person at a time.
- You want a quick laptop-based setup.
- You do not need several microphones connected simultaneously.
- You prefer fewer separate hardware components.
The limitation is expansion. Adding several USB microphones can create device-management and software-routing complications. Before buying, check operating-system compatibility, available ports, monitoring features, cable type, and support for your preferred recording platform.
XLR microphones: more flexible for growth
An XLR microphone sends an analog signal to an audio interface, mixer, recorder, or podcast production console. This adds hardware, but it can provide more control over inputs, gain, headphone monitoring, and multi-person recording.
XLR is usually the better foundation when you expect to:
- Record two or more people in the same room.
- Use separate microphone channels for each guest.
- Connect microphones to a mixer or podcast console.
- Upgrade microphones without replacing the entire recording approach.
- Use the same microphones across several interfaces or recorders.
XLR condensers generally need phantom power. A balanced moving-coil dynamic generally does not, but USB models and specialized microphones may differ. Shure’s phantom-power reference explains both the purpose of phantom power and why the microphone manual should remain the final authority.
What about a microphone with both USB and XLR?
A dual-output microphone can bridge the two workflows. You can begin with USB for a simple solo setup and later use XLR with an interface or mixer. As one verified example, RØDE lists the PodMic USB as a dynamic microphone with both USB-C and XLR connectivity.
This flexibility may reduce the risk of outgrowing your first microphone. It can also increase the purchase price, so compare the complete system cost rather than paying for connectivity you will never use.
Which microphone type fits your podcast format?
Solo podcasts
For a solo show recorded at a desk, both types can work. Choose a dynamic if your office is noisy, your room is untreated, or you want a forgiving setup. Choose a condenser if your space is quiet and you can maintain a consistent distance from the microphone.
USB is usually the simplest connection for a one-person show. XLR becomes more attractive if you already own an interface or plan to add in-person guests.
In-person guest interviews
Guest interviews increase the value of predictable positioning and separate control. A dynamic microphone is often practical because each speaker can work close to their own microphone without emphasizing as much room sound.
For two or more local speakers, XLR is generally easier to scale. Each person can receive a separate input and level adjustment. Two USB microphones may work in some software environments, but they can require additional configuration and troubleshooting.
Remote interviews
For a remote guest, your microphone captures your side of the conversation, so select the type that suits your own recording room. A dynamic is sensible for a home office with background noise. A condenser can work well if your room is quiet and your camera framing allows consistent placement.
The guest’s microphone and recording method may matter more than small differences between your own microphone types. A reliable workflow should preserve separate local recordings when possible and keep each speaker on an independent track.
Video podcasts and livestreams
Video adds a visual constraint: the microphone must sound good without blocking the face or distracting from the frame. A dynamic microphone placed close to the speaker can work well on camera, but you may need a boom arm or carefully positioned stand.
A condenser can be useful when it must sit farther away, but increased distance also increases the room’s contribution. Test the angle and distance before committing to a visual format.
Setup and positioning tips for either microphone
Microphone type matters, but positioning often creates the larger audible difference. Use these steps regardless of whether you choose a condenser or dynamic model.
- Place the microphone close enough for a strong voice signal. Close placement usually reduces the amount of room sound relative to your voice.
- Aim at the correct speaking side. End-address microphones are spoken into the front or end; side-address microphones are spoken into the side. Check the manufacturer’s guide.
- Keep distance consistent. Moving closer and farther away changes volume, bass response, and room contribution.
- Use a pop filter or windscreen. This helps reduce explosive breath sounds from consonants such as “p” and “b.”
- Use a stable stand or boom arm. Desk bumps and cable movement can become distracting low-frequency noise.
- Turn toward soft furnishings when possible. Avoid aiming the microphone directly at a bare wall or glass surface.
- Monitor with headphones. Listen for HVAC noise, mouth clicks, keyboard sound, distortion, and room echo before recording a full episode.
Do not assume that speaking louder fixes a weak recording. Set a healthy input level, keep your position stable, and avoid clipping. If your workflow includes transcript production or content repurposing, clean source audio can also reduce downstream editing work. Podtools’ guide to building a podcast workflow with AI tools can help connect recording, editing, transcription, and publishing steps.
Buying checklist for small-business podcasters
1. Start with the room
Write down the sounds you hear during your normal recording time. If the list includes persistent noise or echo, prioritize a dynamic microphone or improve the space before buying a highly sensitive condenser.
2. Decide whether you need USB, XLR, or both
USB is convenient for a single host. XLR is more adaptable for multiple speakers and future equipment changes. A dual USB/XLR model can be a compromise if you value both simplicity and expansion.
3. Calculate the complete setup cost
Include a stand or boom arm, pop filter or windscreen, cable, and—when using XLR—a suitable interface or mixer. A microphone that appears inexpensive can cost more after required accessories are included.
4. Check gain requirements
Some dynamic microphones need more clean gain than a basic interface provides. Check the interface’s preamp specifications and plan for a compatible setup. Do not assume that every interface drives every dynamic microphone equally well.
5. Compare editing time as part of ownership cost
Ownership cost includes accessories, interface hardware, replacement cables, mounting solutions, and the time spent fixing room noise or unwanted reflections. A more sensitive condenser may be cost-effective in a treated room but expensive in editing time in a busy office.
6. Check monitoring and compatibility
For USB models, verify computer and mobile compatibility, headphone monitoring, connector type, and recording-software support. For XLR models, confirm that your interface has enough inputs and phantom power when required.
7. Avoid choosing by frequency-response charts alone
Frequency response is useful, but it does not tell you how a microphone will interact with your voice, room, distance, and speaking style. A microphone that sounds impressive in a product demonstration may be less practical in your actual workspace.
What are the disadvantages of using a condenser mic?
The main disadvantages are practical rather than absolute. Condensers can capture more room sound and background noise, require power in many configurations, and reveal breath, mouth, chair, and keyboard sounds more readily. They can also be less forgiving when the speaker moves around or changes distance.
In a controlled room, those same characteristics can produce detailed and natural voice recordings. The question is whether your environment and production process can take advantage of the sensitivity without creating extra cleanup.
Do singers use dynamic or condenser microphones?
Singers use both. Condensers are common in controlled studio recording because they can capture fine detail and transients. Dynamics are common in loud live environments where durability, handling, and isolation are important. Podcasting has the same basic tradeoff: the best type depends on the source, room, distance, and desired sound.
Final recommendation by recording environment
- Untreated home office: Start with a dynamic microphone close to the speaker and reduce obvious room noise where practical.
- Quiet room with soft furnishings: Consider a condenser if you want extra vocal detail and can maintain consistent positioning.
- Shared office or storefront: Choose a dynamic and record during the quietest available time.
- Solo laptop podcast: USB is the simplest route; select a USB dynamic or condenser based on the room.
- In-person interviews: Favor XLR and dynamics if you need separate channels and predictable room control.
- Growing video podcast: Consider a dual USB/XLR dynamic if you want a simple starting point with a clearer upgrade path.
Bottom line: For most small-business podcasters starting in a real-world room, a dynamic microphone is the safer first choice. It is usually easier to position, more forgiving of background noise, and practical for guest interviews. Choose a condenser when your room is quiet and controlled enough to benefit from its sensitivity. Then choose USB or XLR based on how many people you record today—and how much your podcast is likely to grow.
Once the microphone decision is settled, keep the rest of the workflow focused on reliable production. You can use Podtools’ guide to turn podcast episodes into blog posts after recording instead of trying to solve every equipment question at once.